Showing posts with label knifemaking. Show all posts

Monday, January 4, 2010

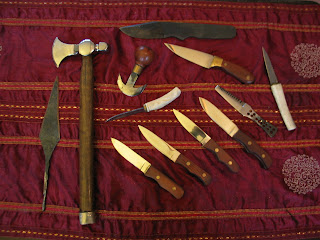
Knifemaker Interviews: Jason Burgin

How did you get into Knifemaking?
My father gave me my first Swiss Army Knife as a kid and since then I was amazed at the quality and functionality of such a small package. Since then I was always searching for the perfect knife; a goal I will never realise, I think.

One day in 1992 I thought "I will have to make my own knife..."
I picked up the yellow pages and searched for knifemaking/knife kits and anything else that might help me find my goal.
It was here I found a small ad "Keith Fludder, custom knifemaker"
I rang him and said “can I come and buy a kit knife from you?”
The next day was the start of my journey as a knifemaker.

A lot of newer Knifemakers have the advantage of the wealth of information provided by online forums & tutorials to help them get started. Did you have it so easy?
I was so keen to make knives - it just seemed natural to start grinding and shaping something, but it was only with the benefit of Keith’s experience, his guidance, resources and friendship that I was going in the right direction. These early days were paved with far more pitfalls than now, but I still managed to save money for equipment and scavenge steel for blades and find suppliers of woods and other materials that are just a tap of the keyboard away nowadays.

What's your design process? Sketch, Cad, or do you just get straight to work? Where do you source your inspiration for your designs?
for a stock removal knife, I will draw a profile on a piece of steel, I will keep changing the shapes and curves until I feel it looks right, then I start cutting the profile and make the shapes flow together as I grind the profile on the linisher.
For folding knives, I will start with a size and style in mind and choose the materials suitable for that type, then I develop the shapes as I configure the geometry of the locking mechanism and go from there.

Do your knives say anything about where you're from?
I try to demonstrate an un-bounded freedom that the canvas of steel can allow but still retain total useability; kind of a form meets function approach.

What's your preferred style of knife to make?
I like to make small liner lock folders and small pocket-able fixed blades, quite often hollow grind but also flat grinds.

How long typically, will a knife take for you to build?
Small fixed blades take me 6-12 hrs.
Folders take 25-40 hrs but I am a hobby knifemaker so time is very hard to judge.

What's your favourite material/s to use in your handles and blades? Preferred finishes?
I really like using stainless damascus for blades.
Mokume and carbon fibre for folder handles, stag horn and burl woods for fixed blades.

Have you had any strange requests for knife/kit design?
I've been asked to make a bowler hat with a sharp rim, À la James Bond style, which I declined.

What's the greatest challenge you've had in Knifemaking? Any regrets?
Every step of the way there are new challenges and higher goals to reach for. Sometimes I have to temper my enthusiasm with the reality of time, cost and space restraints. I wish my job was more closely related to metalwork/machining.

Do you make anything aside from knives?
I make small carved skull beads from mokume, damascus and other materials and small jewellery/art trinkets and miniature oddities from scrap materials.

Where do you see your Knifemaking going in the next few years?
Make more folders and streamline the process. I would like to do a large scale, high end, damascus fantasy piece.

What knife do you carry?
I have my 2" keychain linerlock with damasteel and carbon fibre made by myself about 6 yrs ago and my latest folder, a 4 1/4" linerlock with damasteel twist blade, carbon fibre scales and titanium liners.


Photos courtesy of Jason Burgin

Wednesday, July 29, 2009

12 Questions for Aussie Knifemakers

I've been fortunate in my knifemaking, in that I've been able to learn a lot of things from online forums that would have taken longer had I been sourcing the information from written material. The advantage with reading "How to" posts is that if you have a question, you can ask the author directly, and you get a lot of varying opinions and perspective rather than the input of one, or several people.
Don't get me wrong, I love printed text and I'm never going to be satisfied with my collection of books, but it's nice being able to have a search engine at your disposal when you want to find out if there's a better way of something you're stuck on.

Over a series of posts, I'm going to be interviewing some of the knifemakers that frequent Laventrix Knife Forum see how other makers approach the craft.

Some of the knifemakers I'll be interviewing have been doing it for some time, and others are (like myself) fairly new to things, so it should provide an interesting dynamic.

Wednesday, July 22, 2009

Tang Stamp

I had a tang stamp made recently. It's the same logo I use on the site but significantly smaller - so small in fact that I've actually been having a lot of difficulty testing it out on scrap bits of steel.
I'm not sure if it's actually the size that's the issue, but more the shape.. or maybe I just need to practice a whole lot more before I can get it to look right. It seems to pull to the left or the right whenever I hammer it so I end up with half a logo embedded in the steel.

On the other hand, as a song goes it "looks good in leather" so I've got no complaints if I want to stamp sheaths. I'm considering building a press with a hydraulic jack so I can align it properly and not have to hold it with one hand while using the other to attack it with a hammer.

Another consideration is that I go back to my design and put a little more work into it. We'll see though.


Sunday, July 19, 2009

A New Knife

This was one of the timber swap knives I made; for a fella who was kind enough when sending me some beautiful sheoak to include a hand turned pen and awl.
The knife is made from a Nicholson file and I've finished it with a vinegar patina (an experiment that worked out quite nicely). The handle is made from corian, black and white spacer material and kingwood, with a Danish oil and wax finish.

The knife's new owner and I agreed that a sheath was in order and I decided to make up a firesteel while I was at it.


Tuesday, July 14, 2009

A Different Kind of Knife...

...and even a spoon. It's a little late to be making this post considering I made these fiddleback redgum butter knifes and a jam spoon for Mothers' Day, but I forgot to take a photo at the time and keep forgetting to take my camera when I see Mum. Until now.


Forgive the B&W photo. I've since learned that using a red and white checkered tablecloth as a background leads to very red, overexposed images.

Tuesday, July 7, 2009

What Makes a Knife a Knife?

As you (the reader of this blog) may be aware, I have been following The Suburban Bushwacker for some time now and recently made him a knife to review. Well this isn't a link to the review (that's to come later) but I'd like to share this informative article he's written on buying the right knife.


If you have a general love of the outdoors, and/or bushcraft I'd also recommend having a look through his other posts. In fact, have a read even if you're not into bushcraft and spent your days in a darkened room surfing the net.. it might help.

Photo Credit: Todd Hill - Primitive Point

Saturday, June 27, 2009

Forges and Fire: Part 1

The Firebrick Forges:
I started this forge about 2 months ago with firebricks and refractory cement I purchased from Consolidated Refractories.
It’s basically 2 heavy firebricks with a chamber of light firebricks built around them. I’ve cut down some of the bricks with a hacksaw to give me the chamber space I was after and to provide a ‘doorway’ in the front for the material to pass through.
A hole has been hollowed out of the side with a blunt chisel to allow for a gas torch.
This didn’t work from the beginning and it still doesn’t. One of the issues is that I know very little about forges, let alone building them from scratch. I’ve done some research on this and although the information I’ve found has been very useful, some things are difficult to interpret from words and pictures alone so I think this is going to be another trial and error exercise on my part.
I think the main problem with the forge is the chamber. It’s too big – and it’s square. This means that not only is the little MAPP gas torch (guessing here) not pumping out enough pressure to flood the chamber with heat, it’s also firing directly into the opposite wall, which is… a flat surface – so when the flame hits this wall it just sort of bounces back towards the torch.
I think that if I had made the chamber cylindrical, and a little smaller, the flame would have had an opportunity to swirl towards the front of the chamber and disperse the heat evenly. I’m either going to shape some of the remaining firebricks to put in as inserts to give me the shape I now think the chamber needs, or use refractory lining (kaowool, ceramic fiber) to do the job – but either way; Forge Mark I is going on hold for the time being.


After the failed attempt at the first forge I’ve made a temporary one out of a single firebrick. I got this idea after reading Wayne Goddard’s $50 Knife Shop, and subsequently reading Blade’s Guide to Making Knives where Wayne goes into slightly more detail about the forge.
The forge is basically a hollowed out firebrick with a hole in the side for the gas torch to poke through (similar to the design of my first forge but on a smaller scale) and the firebricks I have access to are smaller than Wayne Goddard’s so it gets really hot because of the narrow chamber - though it doesn’t allow a lot of space for billets. It’s great for annealing and it was big enough to accommodate the Tree Project leaves while I was forging them, but I can’t see it being used for anything much bigger than that.

Monday, June 15, 2009

Knives for L & S

I made a few knives recently my best friend and her fiance.
L's a stay at home mum with a shoemaking background and general creative and artistic flair so I thought a utility/craft knife would be suitable. I wanted to make a wharncliffe style blade with a hidden tang for a left hander.
I made the blade out of the other end of the file I used for SBW's knife and the handle is nickel silver, tin, reconstituted stone, black and white spacer material and curly birch finished with Danish oil.


S is a whiz in the kitchen so a chef knife was the obvious choice - or at least obvious after asking L for ideas and having her suggest it. I freely admit that I cheated with this knife and actually bought the blade as a blank, rather than grinding it myself. I was concerned that I'd grind too much off making such a thin knife and simply didn't want to take the chance. So rather than this being a custom knife it's more of a 'customised handle' knife, as all I had to do was fit a handle and give the blade a bit of a quick sharpen and strop.
The blade is a 440c stainless Santuko that I purchased from Jantz Supply in the US. Handle is made from red spacer material and Fiddleback Redgum. I finished it with a few coats of danish oil and sealed with wax.


Friday, June 12, 2009

Knives by Dave Myhill

I met Dave Myhill about 7 years ago when I was at the home of my best friend (Dave's daughter, L) having a bit of a catch up, and he dropped over for a visit.
At the time, Dave was a little apprehensive about the boys his daughter spent time with, and had the misconception that this young lad sipping tea with his only female heir must be her boyfriend, or at least a potential candidate - so he offered to take me hunting, and said he'd even give me a 3 day head start.

Dave also took the time to explain that he could lodge a knife, bullet, or arrow in me from 30 yards with very little difficulty on his part.

We had a few chance encounters shortly after that (helping L move house, the occasional shared meal, birthdays, etc.) and we gradually began to warm to each other. On several occasions I even made the trip to Dave's place on the Mornington Peninsula with L to help out with some yard work.

A few short years later Dave and I really started developing a friendship. He'd tell me at great length about knives and damascus steel and I was fortunate enough to spend some time with him in the shed getting a crash course in forge-welding.

Sadly, Dave passed away at the beginning of last year after a lengthy battle with cancer. This was pretty hard to take considering Dave had become very much like a second father to me.
I'm not sure if this is the right choice of words but maybe the one good thing to come from this was that it prompted me to start making knives on my own. At some point in the future I hope to start my first forged knife and give the finished product to L as a tribute to her father's dedication to the craft of knifemaking.

While recently attending the knife show I ran into a friend of a friend and she introduced me to her partner A, who happens to be a knife collector.
We got to talking and it turns out A rarely missed an opportunity to wander past Dave's stand at shows past and usually walked away with one of his knives.

He offered to let me come over and look at his collection, and was kind enough to donate some of Dave's unfinished blanks, agreeing that as payment I would put a handle on one of them for his partner.

A's Collection of Myhill Blades
I've decided that I'll finish the large trade blade and keep that for myself, but the large dagger will be redesigned into a tanto style blade for an old friend and the smaller utility knife will be finished and one day be given to my godson - who happens to be one of Dave's grandchildren.

Knife Blanks

Wednesday, June 10, 2009

Timmmber!

Considering I'm not yet accepting payment for my work I've been trying to keep my costs down, so obtaining something for little or no charge is pretty appealing. With that in mind, about 8 weeks ago I put a post on WoodworkForums introducing myself as a relatively inexperienced knifemaker seeking timber offcuts for use in knife handles (or, my version of a stray dog dancing for scraps out the back of a restaurant).
There was pretty great response too - thanks very much to those who contributed.

(I'm not sure if the generous users who helped me out would like me showing their usernames in this post so I'm just going to list some of the timber I now posess.)

Osage Orange, Fiddleback Redgum, Walnut, Cooktown Ironwood, Eucalyptus burl, Yellowbox, Wattle, About 7 varieties of Sheoak, Raspberry Jam, Turpentine, Tuart, Curly Eucalyptus and Queensland Walnut

I also purchase a few bits of wood from the knife show recently. Found some really nice Blister Ooline, Flame Bulloak and Ivory Needlewood.

I don't think I'll need to restock the timber shelf for some time.

Wednesday, April 1, 2009

Sami, not a Scandi machete

Example of a Sami from Wikipedia
I stand corrected. A diligent observer has noted that "Long blades are not usually used in scandinavia as tools...
.. Lapplanders of course have the "leuku" but it is a different design from a scandi "puukko"."

That said I never knew if the Scandinavians had machete type instruments in the first place so I was hoping to try something that hadn't been done. As it stands I'll be trying something that's been done by the Sami people in Finland for I don't know how long (probably a while, I'm guessing).

So here's my chunk of file which is going to end up looking more or less like a really big Leuko, or Sami.


Thanks for the update, Pun.

Knife for The Suburban Bushwacker

I've been following SBW's blog for some time now and recently asked him if he'd be kind enough to review one of my knives. As a thankyou for taking the time to post a review I've offered to make a knife to SBW's specifications and he's kindly accepted.

After a few emails back and forth regarding the design we settled on making a full tang scandi styled knife, loosely based on Rod Garcia's Skookum Bushtool, though with a deep finger choil and orange G-10 handle.

The initial sketch I sent through to SBW (above) shows the handle with two tubes holding the scales to the tang, and pins arranged in the shape of the Southern Cross (A constellation seen in the Australian skies). The buttcap is to be welded on to the tang.
The design has changed slightly in that the index finger choil will be deeper and (given that I'm making this out of a file) the file markings near the spine of the blade will be ground back to avoid having a rust trap.

I've done the initial grind on the file and now have a blank (once I've removed the rasps) ready for profiling.


More to come later.

Saturday, March 21, 2009

BlackRabbit Logo

I know this blog is called Obsidian Rabbit but truth be told, when I started thinking of trading names for my knifemaking the first thing that came to mind was BlackRabbit. Sadly that name is already being used for another blog, which serves another purpose - but that doesn't mean I can't still use the name for my knifemaking.
So now I have a logo.

Scandi Knife

I have a thing for Scandi (Scandinavian) blades, which I think is strengthened by the fact that we don't seem to have a lot of these available in Australia - I've never seen a commercially made one in a store, and from what I've seen (apologies if I'm wrong) Aussie knifemakers move more towards producing bush knives.
I think the styling of a scandi knife is amazing though. The handles are made for comfort and I can't get past how good a Scandi grind looks.
So here is my attempt at a Scandi blade, though I haven't yet put on the final grind - I'll get around to that later.
Handle materials are made of stainless steel, stag antler, fibre spacers and the wood is gidgee.


Utility Knife Step-by-step: Part 2

I got so caught up in the moment of shaping the handle that I completely overlooked taking any photos of the process.
In a nutshell though, I shaped the handle using the bench grinder. I actually started with the stone wheel which might sound strange for use on wood but it does wonders with removing large quantities at once. I then shaped further using the belt grinder and drum sander.
After shaping the handle I finished sanding the blade with wet and dry, going from 80 grit through to 800.
Then I sanded the handle to 240 grit and finished off with an 800 grit sanding pad. This was followed by several applications of danish oil with a light sand in between coats.
And for the final touch I ran the flade over a clean sisal wheel.

The results are as follows:


The filework shows up really well with the black epoxy.


There are some bits I could have done better but overall I'm rather happy with how things turned out

Monday, February 9, 2009

Utility Knife Step-by-step: Part 1

Ok, it's been a long time coming but I've finally managed to get some work done in the shed and will now attempt to explain how I make a knife.
I've actually been a little sceptical about doing this post because it really is a 'warts and all' insight into how I put a knife together. It shows the mistakes I make as I'm learning this craft and the efforts I put into correcting those mistakes.
If for example, I manage to bust one of the scales as I'm grinding the handle, I'm more inclined to try to repair it than start again.
It's a learning curve for me and I'll know not to do whatever I did wrong next time around.
The way I see it is this: These are knives I make for myself and for my close friends and family. If you give someone something you've spent countless hours producing, it's unlikely they'll nitpick about an imperfection.

I'll warn you now, this is a long post and some of the pics were rushed so please forgive my photography this time around.

Everything I've made so far has been done using the stock removal method. This involves taking a piece of steel, cutting a knife 'blank' out of the material (I use an angle grinder with a cutting wheel), and then shaping the steel using whatever means one has available before finally adding a handle and finishing the knife.
There are other steps involved in this process and I'll try to detail them as I go.

I've already cut out the blank, as per my last post and need to continue grinding the steel to refine the profile and overall shape of the knife.
What I didn't mention in my last post is that with some of the steel I use I need to anneal it before working on it - in some cases before even cutting out the blanks. The pieces I'm working on now are all from a piece of HRPO which is tough as anything so I gave it a quick run over with the MAPP torch right after I scribed the blank patterns into it - I did this so it wouldn't rip through my cutting wheels, and even then I was still using on average one wheel per blank.
I then gave the blank another pass with the torch after it had been cut out, bringing it up to cherry red and then letting it cool slowly before beginning the grinding process.

I don't have pictures of this in progress but I used a multi-tool linishing attachment on my bench grinder to grind the profile into the blade. I've basically moved the blank from the ricasso to the tip on each side of the blade horizontal to the belt until I'm happy with the amount of material that has been removed.
After doing this, I've draw filed the blade so I can have more control over the shaping.
I haven't draw filed before making this blade but I'm pleased that I did because previously I feel I've overdone it with grinding and haven't ended up with the type of finish I was after. I found it's also a lot easier for me to put a ricasso on the blade using a file rather than the belt.


After shaping the blade I've drilled holes for the pins. I'm trying a few different things this time around. It's a full tang knife so I really want to make sure the handles hold strong so I'm putting in 4 small pins and two larger ones.

Because I'm a dolt and never bother to properly measure anything I have 4 extra holes that I won't be using - but they'll be covered by the handle and will give a little room for extra glue.


In the spirit of self discovery and learning I decided I'd have a go at making some mosaic pins. I'm not going to go in to detail on how this was done in this post but I learned how to do it http://www.northcoastknives.com/northcoast_knives_tutorials_hints_tips4.htm and here.

The gist of it is: insert a few bits of wire into a larger diameter tube with glue and allow to set before sticking in a knife handle.


I've also done a little filework on the spine of the tang, following a tutorial I found here.


For the next part I've put one of the handle scales in the vice and drilled holes for the larger pins and the lanyard hole. I've then used the pins to hold the knife in place on top of the scales so I can drill the 4 smaller holes.


After the holes are drilled swap out the scale for the undrilled scale, replace the knife and the pins (though now they're the other way around) and drill through the existing holes so they're mirrored in the other scale (I hope that made sense).


With all the holes drilled I'm now ready to assemble the handle and glue everything up. For additional places for the glue to run I've drilled a few indentations between the pin holes on the inside of the scales.


Before I assemble the handle I heat treat the blade - this deserves a more detailed description so I'm saving this for another post.

Before I glue anything I make sure all the pin holes line up so I don't work out something has gone wrong as I'm gluing everything together.
I apply epoxy to the insides of the handles, to the tang, and press it into each pin hole before inserting the pins and clamping everything in place.
I added a little black ink to the epoxy - explanation for this will come later.


I'll post part 2 in a few days.

Tuesday, January 6, 2009

New Blanks

I admit it - I'm slack. I haven't posted in a bit, and that's because I haven't been making any knives recently. A lot of other things have been happening (ala Christmas) but I'm back in the swing and I'll be putting up more posts shortly.
I made a few new blanks last week and have picked out the one I'll be working on first. I usually work on a few things at once but for the moment I'll be focusing on making a utility knife. I'll do my utmost to show step-by-step the process I use for making knives with this one as the example.
Thanks for reading. And thanks for your patience.


The four blanks: Two utilities, and two hunters/skinners. I'm going to grind one of the utilities further so it can have a half-tang handle.


The full tang utility after a quick shape on the grinder. More "in progress" pics to follow in a later post.

Monday, November 3, 2008

Bush Knife


I thought while I was at it with making big knives, I'd try my hand at a bush knife. I guess you could call it a machete but that makes it sound rather aggressive so I'm sticking with bush knife.

A friend kindly handed me a few lengths of HRPO (Hot-Rolled Pickled & Oiled) steel. That stuff is STRONG! I thought I'd try cutting a piece off to work with before I annealed it, and it made a mess of the cutting disc I had on my grinder.

So the design isn't really my own - I borrowed a few ideas from here and there. But I figure that I'm not making and selling these so making one for personal use shouldn't stir anyone up too much.

I wanted to have a billie hook but keep the rest of the design as simple as possible so the handle is just a paracord wrap. I say 'just' lightly though - for functionality purposes I'd take paracord over the nicest of timbers.
I've got the macho knives out of my system for now so I'll be going back to something smaller for the next post.

Bowie Knife


I've never had a bowie knife. I know they have a function (aside from looking menacing), but most of the time I don't need anything that big - and if I do, I reach for the axe.
But I wanted to try making one - I also wanted to try making a half tang knife. And the thing I learned.. is that I'll need to try harder next time. I was rushed with this one, and I think knowing that I was making it for myself, I didn't give it the attention it deserved.
So on to the details. I started out with a piece of tool steel, annealed it with the ol' blowtorch, and cut out the blank with an angle grinder, then shaped it up on the bench grinder.
The design wasn't too difficult to come up with - but given that I keep breaking steel guards when I'm trying to make them I cut up a piece of micarta and used that for the guard - that was my first mistake.
The micarta slabs I have really aren't that thick, maybe 10mm. So I had to drill the holes for the tang but leave enough space around them for the rest of the guard. To make the handle not look rediculious, I made this a similar thickness - so when I had glued everything up and got to shaping it, I ended up cutting in too deep and as you can see from the pics, ended up with a resin pommel/butt/bolster/what have you.
I also managed to overshape the micarta top the point where there is a very deep groove where the guard meets the shoulder.
Like everything in this blog, it was a learning curve - and I'm happy to learn - but I do hope I do better next time.
Oh, and before I forget - the wood is curly birch. I gave it a little brown leather stain for the colour.

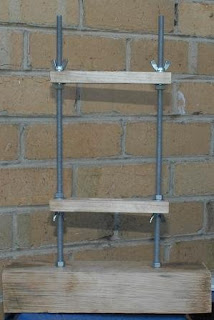
Handle gluing rig


After the last knife I decided I needed something to hold the handle against the knife while the glue was setting - so I headed down to Bunnings, picked up length of threaded rod and cut it in half with the hacksaw when I got it back to the garage.
I drilled a few holes in a large piece of oregon I had sitting around and bolted the rods in place.
Then I attacked a few pieces of pine with a chisel and positioned these on the rods with nuts and washers and voilà - now I don't have to cover handles in elastic bands to get them to stay still while the epoxy cures.
I tested this out with my first half tang knife. It pushed the guard and handle together nice and tight - almost too tight in fact - it took ages to the epoxy to cure.
I'm thinking I'll be using this again in the future though.